In this tutorial, i will describe how to install and setup an openshift container platform (OCP) 4.10 cluster with high available architecture manually. This is a step by step guide for installing an OpenShift 4 cluster with high availability, and i will try my best to describe it as clearly as i can. This installation will use connected network to pull images online, for disconnected or offline installation, i will describe it later. The virtual machines used will be manually provisioned in vmware esxi platform. For high availability, a load balancer should be available, i will use haproxy as a soft load balancer, for enterprise or production case, use f5 or others instead, all operatoions performed bellow are as root user, okay, let’s start.
Environment Summary of OpenShift 4 high available installation
This environment and setup can be used as a dev or stage environment, for production environment, load balancer and dns service should also be high available, infra nodes and ingress nodes should be seperated. These machines do not need to be ready at this time, setup each one following the steps described bellow.
Node list
| Role | IP | Hostname | Note |
|---|---|---|---|
| Control plane | 192.168.1.21 | master0.ocp.xiaoyao.io | 8c/16G/100G disk |
| Control plane | 192.168.1.22 | master1.ocp.xiaoyao.io | 8c/16G/100G disk |
| Control plane | 192.168.1.23 | master2.ocp.xiaoyao.io | 8c/16G/100G disk |
| Worker/Ingress | 192.168.1.24 | worker0.ocp.xiaoyao.io | 8c/16G/100G disk |
| Worker/Ingress | 192.168.1.25 | worker1.ocp.xiaoyao.io | 8c/16G/100G disk |
| Bastion/LB | 192.168.1.8 | bastion.ocp.xiaoyao.io | 4c/8G/100G disk |
| Bootstrap | 192.168.1.20 | bootstrap.ocp.xiaoyao.io | 8c/16G/100G disk |
Note
the bootstrap node can be removed when the cluster is up
Cluster Setting
Base Domain: xiaoyao.io
Cluster name: ocp
Route sub domain: *.apps.ocp.xiaoyao.io, dns server resolv this doamin to lb node, and haproxy dispatch traffic from 80 and 443 to ingress nodes.
Ingress nodes: worker0.ocp.xiaoyao.io, worker1.ocp.xiaoyao.io
OpenShift Version: 4.10.47
Coreos Version: 4.10.37
Install Bastion Server
We need a bastion server for some services such as load balance, webserver, dns service. if you are in offline installation mode, an image registry should also be deployed. A bastion server do not need high quota resources, 4core 8G memory, 100G disk space is enough. On this server, we generate and store installation files, centos stream 8 is base os with minimal installation, hostname is bastion.ocp.xiaoyao.io, with static ip 192.168.1.8, dns server: 114.114.114.114.
Prepare Server
Disable firewall and selinux, for production, this server will be removed after cluster is up. for dev purpose, these services are disabled, and you can keep bastion server alive, for other version’s try out.
# systemctl stop firewalld
# systemctl disable firewalld
# setenforce 0
# vi /etc/selinux/config
SELINUX=disabled
SELINUXTYPE=targeted
obtain installation binary, download specifc openshift install client from here
# dnf install -y wget
# wget https://mirror.openshift.com/pub/openshift-v4/x86_64/clients/ocp/4.10.47/openshift-install-linux-4.10.47.tar.gz
# tar zxf openshift-install-linux-4.10.47.tar.gz
# mv openshift-install /usr/local/bin/
Download coreos iso image from here and upload it to your esxi datastore. Creating vm from this iso in later steps.
Download image pull secret file from here, if you do not have an account, register one, and save it in /root/pull-secret.txt.
Download openshift clients binary from here, this file contains oc and kubectl command line tools.
# wget https://mirror.openshift.com/pub/openshift-v4/x86_64/clients/ocp/4.10.47/openshift-client-linux-4.10.47.tar.gz
# tar zxf openshift-client-linux-4.10.47.tar.gz
# mv oc /usr/local/bin/
# mv kubectl /usr/local/bin/
Setup DNS Service
I use named for dns resolution, install and configure named on bastion server. if you are in public cloud infrastructure, such as aws, azure or gcp, use the dns service provided by them.
# dnf install -y bind bind-utils
# vi /etc/named.conf
listen-on port 53 { any; };
allow-query     { 0.0.0.0/0; };
dnssec-enable no;
dnssec-validation no;

# systemctl enable named
# systemctl start named
setup cluster nodes and api domain resolution, add a custom zone in file /etc/named.rfc1912.zones
# vi /etc/named.rfc1912.zones
zone "ocp.xiaoyao.io" IN {
    type master;
    file "ocp.xiaoyao.io";
    allow-update { none; };
    allow-query { any; };
    allow-transfer { none; };
};
// create file ocp.xiaoyao.io in /var/named/
# vi /var/named/ocp.xiaoyao.io
$TTL 1W
@       IN      SOA     ocp.xiaoyao.io. root (
                        2019070700      ; serial
                        3H              ; refresh (3 hours)
                        30M             ; retry (30 minutes)
                        2W              ; expiry (2 weeks)
                        1W )            ; minimum (1 week)
        IN      NS      ns1.ocp.xiaoyao.io.
        IN      MX 10   smtp.ocp.xiaoyao.io.
;
;
ns1.ocp.xiaoyao.io.             IN      A       192.168.1.8
smtp.ocp.xiaoyao.io.            IN      A       192.168.1.8
;
bastion.ocp.xiaoyao.io.         IN      A       192.168.1.8
;
api.ocp.xiaoyao.io.             IN      A       192.168.1.8
api-int.ocp.xiaoyao.io.         IN      A       192.168.1.8
;
*.apps.ocp.xiaoyao.io.          IN      A       192.168.1.8
;
bootstrap.ocp.xiaoyao.io.       IN      A       192.168.1.20
;
master0.ocp.xiaoyao.io.         IN      A       192.168.1.21
master1.ocp.xiaoyao.io.         IN      A       192.168.1.22
master2.ocp.xiaoyao.io.         IN      A       192.168.1.23
;
worker0.ocp.xiaoyao.io.         IN      A       192.168.1.24
worker1.ocp.xiaoyao.io.         IN      A       192.168.1.25
;

# systemctl restart named
Add reverse dns resolution, these are also needed for cluster installation,
# vi /etc/named.rfc1912.zones
zone "1.168.192.in-addr.arpa" {
    type master;
    file "1.168.192.in-addr.arpa.zone";
    allow-query { any; };
    allow-transfer { none; };
    allow-update { none; };
};
// create file 1.168.192.in-addr.arpa.zone in /var/named/
# vi /var/named/1.168.192.in-addr.arpa.zone
$TTL 1W
@       IN      SOA     ocp.xiaoyao.io. root (
                        2019070700      ; serial
                        3H              ; refresh (3 hours)
                        30M             ; retry (30 minutes)
                        2W              ; expiry (2 weeks)
                        1W )            ; minimum (1 week)
        IN      NS      ocp.xiaoyao.io.
;
8.1.168.192.in-addr.arpa.       IN      PTR     api.ocp.xiaoyao.io.
8.1.168.192.in-addr.arpa.       IN      PTR     api-int.ocp.xiaoyao.io.
;
20.1.168.192.in-addr.arpa.      IN      PTR     bootstrap.ocp.xiaoyao.io.
;
21.1.168.192.in-addr.arpa.      IN      PTR     master0.ocp.xiaoyao.io.
22.1.168.192.in-addr.arpa.      IN      PTR     master1.ocp.xiaoyao.io.
23.1.168.192.in-addr.arpa.      IN      PTR     master2.ocp.xiaoyao.io.
;
24.1.168.192.in-addr.arpa.      IN      PTR     worker0.ocp.xiaoyao.io.
25.1.168.192.in-addr.arpa.      IN      PTR     worker1.ocp.xiaoyao.io.
;
;EOF
To confirm dns server working fine, take a nslookup query on bastion server
# nslookup api.ocp.xiaoyao.io 127.0.0.1
Server:         127.0.0.1
Address:        127.0.0.1#53

Name:   api.ocp.xiaoyao.io
Address: 192.168.1.8

# dig +noall +answer @192.168.1.8 -x 192.168.1.8
8.1.168.192.in-addr.arpa. 604800 IN     PTR     api-int.ocp.xiaoyao.io.
8.1.168.192.in-addr.arpa. 604800 IN     PTR     api.ocp.xiaoyao.io.
Setup Load Balance Service
I use haproxy as load balance service, if you are in public cloud environment, use the load balance service provided by them. For enterprise production environment, F5 or other high available load balancer is recommended. Install and setup haproxy
# dnf install  -y haproxy
# vi /etc/haproxy/haproxy.cfg
global
  log         127.0.0.1 local2
  pidfile     /var/run/haproxy.pid
  maxconn     4000
  daemon
defaults
  mode                    http
  log                     global
  option                  dontlognull
  option http-server-close
  option                  redispatch
  retries                 3
  timeout http-request    10s
  timeout queue           1m
  timeout connect         10s
  timeout client          1m
  timeout server          1m
  timeout http-keep-alive 10s
  timeout check           10s
  maxconn                 3000
frontend stats
  bind *:1936
  mode            http
  log             global
  maxconn 10
  stats enable
  stats hide-version
  stats refresh 30s
  stats show-node
  stats show-desc Stats for ocp4 cluster
  stats auth admin:ocp4
  stats uri /stats

listen api-server-6443
  bind *:6443
  mode tcp
  server bootstrap bootstrap.ocp.xiaoyao.io:6443 check inter 1s backup
  server master0 master0.ocp.xiaoyao.io:6443 check inter 1s
  server master1 master1.ocp.xiaoyao.io:6443 check inter 1s
  server master2 master2.ocp.xiaoyao.io:6443 check inter 1s

listen machine-config-server-22623
  bind *:22623
  mode tcp
  server bootstrap bootstrap.ocp.xiaoyao.io:22623 check inter 1s backup
  server master0 master0.ocp.xiaoyao.io:22623 check inter 1s
  server master1 master1.ocp.xiaoyao.io:22623 check inter 1s
  server master2 master2.ocp.xiaoyao.io:22623 check inter 1s

listen ingress-router-443
  bind *:443
  mode tcp
  balance source
  server worker0 worker0.ocp.xiaoyao.io:443 check inter 1s
  server worker1 worker1.ocp.xiaoyao.io:443 check inter 1s

listen ingress-router-80
  bind *:80
  mode tcp
  balance source
  server worker0 worker0.ocp.xiaoyao.io:80 check inter 1s
  server worker1 worker1.ocp.xiaoyao.io:80 check inter 1s
at this time, haproxy cannot resolv node address and hostname, add temporary entry in /etc/hosts file, also, you can set ip address in haproxy configuration file instead of node hostname, then the following entries are not needed.
# vi /etc/hosts
192.168.1.20 bootstrap.ocp.xiaoyao.io
192.168.1.21 master0.ocp.xiaoyao.io
192.168.1.22 master1.ocp.xiaoyao.io
192.168.1.23 master2.ocp.xiaoyao.io
192.168.1.24 worker0.ocp.xiaoyao.io
192.168.1.25 worker1.ocp.xiaoyao.io
start haproxy service
# systemctl enable haproxy
# systemctl start haproxy
Setup Web Server
A temporary web server is needed for store installation files, i use nginx, setup nginx to listen on port 8080, since 80 is used by haproxy.
# dnf install -y nginx
# vi /etc/nginx/nginx.conf
        listen       8080 default_server;
        listen       [::]:8080 default_server;

# systemctl enable nginx
# systemctl start nginx
Generate installation files
Generate ignition files
create install-config.yaml file, install-config.yaml is important and should be saved for later reuse. an ssh public key is needed to ssh login to cluster nodes later, i use bastion node ssh public key, generate an key paire first, and paste public key in install-config.yaml file
# ssh-keygen -t rsa
press enter always
# cat .ssh/id_rsa.pub
copy the public key
# vi install-config.yaml
apiVersion: v1
baseDomain: xiaoyao.io
compute:
- hyperthreading: Enabled
  name: worker
  replicas: 0
controlPlane:
  hyperthreading: Enabled
  name: master
  replicas: 3
metadata:
  name: ocp
networking:
  clusterNetwork:
  - cidr: 10.128.0.0/14
    hostPrefix: 23
  networkType: OpenShiftSDN
  serviceNetwork:
  - 172.30.0.0/16
platform:
  none: {}
fips: false
pullSecret: 'contents of file /root/pull-secret.txt'
sshKey: 'ssh-rsa AAAAB3NzV.... root@bastion.ocp.xiaoyao.io'
Note
For offline installation, registry configuration and certificates configuration should also be included in install-config.yaml, we do not cover it here.
generate installation ignition files
# mkdir ocp && cd ocp
# cp ../install-config.yaml .
# openshift-install create manifests --dir .
INFO Consuming Install Config from target directory
WARNING Making control-plane schedulable by setting MastersSchedulable to true for Scheduler cluster settings
INFO Manifests created in: manifests and openshift
Note
if you wants to customize the partition of nodes, update manifests file here in openshift directory, we do not cover it here.
# openshift-install create ignition-configs --dir=.
INFO Consuming Openshift Manifests from target directory
INFO Consuming Worker Machines from target directory
INFO Consuming Master Machines from target directory
INFO Consuming OpenShift Install (Manifests) from target directory
INFO Consuming Common Manifests from target directory
INFO Ignition-Configs created in: . and auth
copy the ignition files into web server root directory,
# cp *.ign /usr/share/nginx/html/
# chmod o+r /usr/share/nginx/html/*.ign
// perform curl test
# curl -v http://192.168.1.8:8080/bootstrap.ign
Install Bootstrap Server
On bastion node, create and save bootstrap.sh file
# vi /usr/share/nginx/html/bootstrap.sh
coreos-installer install --append-karg 'ip= 192.168.1.20::192.168.1.1:255.255.255.0:bootstrap.ocp.xiaoyao.io:eno5:none nameserver=192.168.1.8' --insecure-ignition --ignition-url=http://192.168.1.8:8080/bootstrap.ign /dev/sda
# chmod o+r /usr/share/nginx/html/bootstrap.sh
Note
configure networking parameters in command line by providing –append-karg paramters to core-installer, the format of these parameters , ip::gateway:netmask:hostname:interface:dhcp
Create the bootstrap server and boot it from coreos iso downloaded before. and enter into a live shell, run the following command to start installatoin
# sudo -i
# curl http://192.168.1.8:8080/bootstrap.sh | bash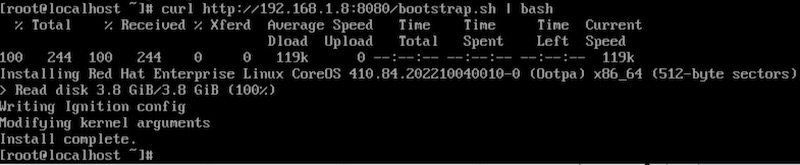
When writing disk completed, enter reboot to reboot bootstrap server.
Install Master Nodes
On bastion node, create and save master bash file for master0, master1, and master2, update the ip address and hostname for each one.
# vi /usr/share/nginx/html/master0.sh
#!/bin/bash
coreos-installer install --append-karg 'ip=192.168.1.21::192.168.1.1:255.255.255.0:master0.ocp.xiaoyao.io:ens192:none nameserver=192.168.1.8' --insecure-ignition --ignition-url=http://192.168.1.8:8080/master.ign /dev/sda

# chmod o+r /usr/share/nginx/html/master0.sh

# vi /usr/share/nginx/html/master1.sh
#!/bin/bash
coreos-installer install --append-karg 'ip=192.168.1.22::192.168.1.1:255.255.255.0:master1.ocp.xiaoyao.io:ens192:none nameserver=192.168.1.8' --insecure-ignition --ignition-url=http://192.168.1.8:8080/master.ign /dev/sda
# chmod o+r /usr/share/nginx/html/master1.sh

# vi /usr/share/nginx/html/master2.sh
#!/bin/bash
coreos-installer install --append-karg 'ip=192.168.1.23::192.168.1.1:255.255.255.0:master2.ocp.xiaoyao.io:ens192:none nameserver=192.168.1.8' --insecure-ignition --ignition-url=http://192.168.1.8:8080/master.ign /dev/sda
# chmod o+r /usr/share/nginx/html/master2.sh
Create three master nodes and boot from coreos iso downloaded before, in coreos live shell, run the follwing command,
# sudo -i
# curl http://192.168.1.8:8080/master0.sh | bash

# reboot
change the master0.sh for other master nodes.
Install Worker Nodes
On bastion node, create and save worker bash file for worker0, and worker1, update the ip address and hostname for each one.
# vi /usr/share/nginx/html/worker0.sh
#!/bin/bash
coreos-installer install --append-karg 'ip=192.168.1.24::192.168.1.1:255.255.255.0:worker0.ocp.xiaoyao.io:ens192:none nameserver=192.168.1.8' --insecure-ignition --ignition-url=http://192.168.1.8:8080/worker.ign /dev/sda

# chmod o+r /usr/share/nginx/html/worker0.sh

# vi /usr/share/nginx/html/worker1.sh
#!/bin/bash
coreos-installer install --append-karg 'ip=192.168.1.25::192.168.1.1:255.255.255.0:worker1.ocp.xiaoyao.io:ens192:none nameserver=192.168.1.8' --insecure-ignition --ignition-url=http://192.168.1.8:8080/worker.ign /dev/sda

# chmod o+r /usr/share/nginx/html/worker1.sh
Create worker nodes and boot from coreos iso downloaded before, in coreos live shell, run the follwing command,
# sudo -i
# curl http://192.168.1.8:8080/worker0.sh | bash

# reboot
change the worker0.sh for other worker nodes.
Confirm Installation
when all the setup of all nodes are completed, on bastion server, run the following command to confirm
# openshift-install --dir . wait-for bootstrap-complete --log-level=info
INFO Waiting up to 20m0s (until 2:48PM) for the Kubernetes API at https://api.ocp.xiaoyao.io:6443...
INFO API v1.23.12+8a6bfe4 up
INFO Waiting up to 30m0s (until 2:58PM) for bootstrapping to complete...
INFO It is now safe to remove the bootstrap resources
INFO Time elapsed: 1m44s
and then comment out the bootstrap node entry in haproxy configuration file, the bootstrap node now can be removed and deleted.
# vi /etc/haproxy/haproxy.cfg
listen api-server-6443
  bind *:6443
  mode tcp
  #server bootstrap bootstrap.ocp.xiaoyao.io:6443 check inter 1s backup
  server master0 master0.ocp.xiaoyao.io:6443 check inter 1s
  server master1 master1.ocp.xiaoyao.io:6443 check inter 1s
  server master2 master2.ocp.xiaoyao.io:6443 check inter 1s

listen machine-config-server-22623
  bind *:22623
  mode tcp
  #server bootstrap bootstrap.ocp.xiaoyao.io:22623 check inter 1s backup
  server master0 master0.ocp.xiaoyao.io:22623 check inter 1s
  server master1 master1.ocp.xiaoyao.io:22623 check inter 1s
  server master2 master2.ocp.xiaoyao.io:22623 check inter 1s

# systemctl reload haproxy
setup kubeconfig and oc environment
# mkdir ~/.kube
# cp auth/kubeconfig ~/.kube/config
Approve worker node csr, so the worker node can join the cluster.
# oc get csr
NAME                                             AGE     SIGNERNAME                                    REQUESTOR                                                                         REQUESTEDDURATION   CONDITION
csr-4dh2x                                        79m     kubernetes.io/kubelet-serving                 system:node:master0.ocp.xiaoyao.io                                                <none>              Approved,Issued
csr-4ls5g                                        2m      kubernetes.io/kube-apiserver-client-kubelet   system:serviceaccount:openshift-machine-config-operator:node-bootstrapper         <none>              Pending
csr-bvtdq                                        35m     kubernetes.io/kube-apiserver-client-kubelet   system:serviceaccount:openshift-machine-config-operator:node-bootstrapper         <none>              Pending
csr-dwlsp                                        80m     kubernetes.io/kube-apiserver-client-kubelet   system:serviceaccount:openshift-machine-config-operator:node-bootstrapper         <none>              Approved,Issued
csr-dxntv                                        70m     kubernetes.io/kubelet-serving                 system:node:master1.ocp.xiaoyao.io                                                <none>              Approved,Issued
csr-fqhnn                                        68m     kubernetes.io/kubelet-serving                 system:node:master2.ocp.xiaoyao.io                                                <none>              Approved,Issued
csr-gldwf                                        43m     kubernetes.io/kube-apiserver-client-kubelet   system:serviceaccount:openshift-machine-config-operator:node-bootstrapper         <none>              Pending
csr-gzr2w                                        28m     kubernetes.io/kube-apiserver-client-kubelet   system:serviceaccount:openshift-machine-config-operator:node-bootstrapper         <none>              Pending
csr-gzzqf                                        50m     kubernetes.io/kube-apiserver-client-kubelet   system:serviceaccount:openshift-machine-config-operator:node-bootstrapper         <none>              Pending
csr-hrwnm                                        20m     kubernetes.io/kube-apiserver-client-kubelet   system:serviceaccount:openshift-machine-config-operator:node-bootstrapper         <none>              Pending
csr-khcf6                                        70m     kubernetes.io/kube-apiserver-client-kubelet   system:serviceaccount:openshift-machine-config-operator:node-bootstrapper         <none>              Approved,Issued
csr-q56rp                                        13m     kubernetes.io/kube-apiserver-client-kubelet   system:serviceaccount:openshift-machine-config-operator:node-bootstrapper         <none>              Pending
csr-stlht                                        2m25s   kubernetes.io/kube-apiserver-client-kubelet   system:serviceaccount:openshift-machine-config-operator:node-bootstrapper         <none>              Pending
csr-wv5xc                                        5m10s   kubernetes.io/kube-apiserver-client-kubelet   system:serviceaccount:openshift-machine-config-operator:node-bootstrapper         <none>              Pending
csr-x8ljb                                        69m     kubernetes.io/kube-apiserver-client-kubelet   system:serviceaccount:openshift-machine-config-operator:node-bootstrapper         <none>              Approved,Issued
system:openshift:openshift-authenticator-77m6h   73m     kubernetes.io/kube-apiserver-client           system:serviceaccount:openshift-authentication-operator:authentication-operator   <none>              Approved,Issued
system:openshift:openshift-monitoring-dxc7n      72m     kubernetes.io/kube-apiserver-client           system:serviceaccount:openshift-monitoring:cluster-monitoring-operator            <none>              Approved,Issued
# oc get csr -o name | xargs oc adm certificate approve
certificatesigningrequest.certificates.k8s.io/csr-4dh2x approved
certificatesigningrequest.certificates.k8s.io/csr-4ls5g approved
certificatesigningrequest.certificates.k8s.io/csr-bvtdq approved
certificatesigningrequest.certificates.k8s.io/csr-dwlsp approved
certificatesigningrequest.certificates.k8s.io/csr-dxntv approved
certificatesigningrequest.certificates.k8s.io/csr-fqhnn approved
certificatesigningrequest.certificates.k8s.io/csr-gldwf approved
certificatesigningrequest.certificates.k8s.io/csr-gzr2w approved
certificatesigningrequest.certificates.k8s.io/csr-gzzqf approved
certificatesigningrequest.certificates.k8s.io/csr-hrwnm approved
certificatesigningrequest.certificates.k8s.io/csr-khcf6 approved
certificatesigningrequest.certificates.k8s.io/csr-q56rp approved
certificatesigningrequest.certificates.k8s.io/csr-stlht approved
certificatesigningrequest.certificates.k8s.io/csr-wv5xc approved
certificatesigningrequest.certificates.k8s.io/csr-x8ljb approved
certificatesigningrequest.certificates.k8s.io/system:openshift:openshift-authenticator-77m6h approved
certificatesigningrequest.certificates.k8s.io/system:openshift:openshift-monitoring-dxc7n approved
Adjust router pods, if your router pod does not running on worker nodes, mybe in master nodes, use the following methods to specify router pods running on specific nodes, such as ingress nodes. then update default ingresscontroller, add nodeplacement selector.
# oc label node worker0.ocp.xiaoyao.io node-role.kubernetes.io/ingress=''
# oc label node worker1.ocp.xiaoyao.io node-role.kubernetes.io/ingress=''

# oc project openshift-ingress-operator
# oc edit ingresscontroller.operator default
spec:
  clientTLS:
    clientCA:
      name: ""
    clientCertificatePolicy: ""
  httpCompression: {}
  httpEmptyRequestsPolicy: Respond
  httpErrorCodePages:
    name: ""
  nodePlacement:
    nodeSelector:
      matchLabels:
        node-role.kubernetes.io/ingress: ""
    tolerations:
    - effect: NoSchedule
      operator: Exists
Confirm all nodes are in ready state
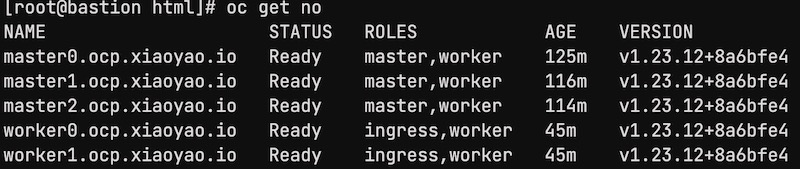
Confirm all cluster operators are in ready state
# oc get co
NAME VERSION AVAILABLE PROGRESSING DEGRADED SINCE MESSAGE
authentication 4.10.47 True False False 19m
baremetal 4.10.47 True False False 132m
cloud-controller-manager 4.10.47 True False False 138m
cloud-credential 4.10.47 True False False 154m
cluster-autoscaler 4.10.47 True False False 128m
config-operator 4.10.47 True False False 134m
console 4.10.47 True False False 16m
csi-snapshot-controller 4.10.47 True False False 132m
dns 4.10.47 True False False 130m
etcd 4.10.47 True False False 129m
image-registry 4.10.47 True False False 118m
ingress 4.10.47 True False False 123m
insights 4.10.47 True False False 126m
kube-apiserver 4.10.47 True False False 126m
kube-controller-manager 4.10.47 True False False 124m
kube-scheduler 4.10.47 True False False 125m
kube-storage-version-migrator 4.10.47 True False False 131m
machine-api 4.10.47 True False False 127m
machine-approver 4.10.47 True False False 131m
machine-config 4.10.47 True False False 38m
marketplace 4.10.47 True False False 3m13s
monitoring 4.10.47 True False False 120m
network 4.10.47 True False False 135m
node-tuning 4.10.47 True False False 56m
openshift-apiserver 4.10.47 True False False 123m
openshift-controller-manager 4.10.47 True False False 127m
openshift-samples 4.10.47 True False False 121m
operator-lifecycle-manager 4.10.47 True False False 130m
operator-lifecycle-manager-catalog 4.10.47 True False False 130m
operator-lifecycle-manager-packageserver 4.10.47 True False False 123m
service-ca 4.10.47 True False False 133m
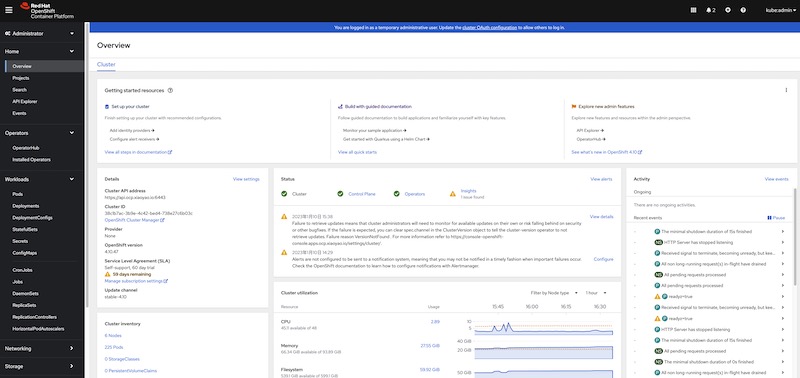
storage 4.10.47 True False False 130mkubeadmin password is in /root/ocp/auth/kubeadmin-password
# cat /root/ocp/auth/kubeadmin-passwordlogin to openshift console with user kubeadmin and password above. The is console url is https://console-openshift-console.apps.ocp.xiaoyao.io/